Wednesday 19 February 2014

JavaScript Tricks: Edit Websites in Browser (Live)

Imagine a world where you are a God and have ultimate control on what happens and more importantly, how it happens. Seems too good a dream. Now it has come true, at least for the online world.

JavaScript tricks
Using this trick, you will be able to edit any webpage live in your browser as if it was a Wiki and change the details according to your wish. Yes, you read that right. You can edit Google or even Facebook for that matter right in your browser and that too without requiring any technical know-how or getting deep into hacking and cracking.

Here is an example picture demonstrating the Google Homepage edited by me to say that I own Google.
Edit Websites Browser

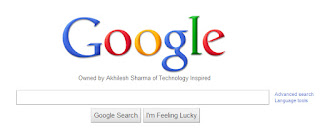
This is just an example. You can use it for anything like showing wrong traffic stats or for fooling people by showing that someone said something about them on Facebook or Twitter. It depends only on your creativity. But I would advise you to stay ethical and use it for entertainment purposes only.

(Mozilla Firefox does not support this. If you use Firefox, you can use the bookmarklets given at the end of this post. If you use Google Chrome and the code does not seem to work, precede it with "javascript:" without quotes.)

To use this trick, all you need to do is just copy the code given below and paste it in your address bar after you have opened the website you wish to edit. And start editing.

javascript:document.body.contentEditable%20=%20'true';%20document.designMode='on';%20void%200
You can capture a screenshot by pressing the Print Screen key or by using the Snipping Tool if you use Windows 7 or Windows Vista. If you wish to again make the website non-editable to give a more authentic look, copy and paste the code given below in the address bar after you are done editing (does not work in Firefox).

javascript:document.body.contentEditable%20=%20'false';%20document.designMode='off';%20void%200

Or, alternatively you can use the following bookmarklets by dragging them to your Bookmarks bar.

1.  Edit this Website

2.  Done Editing

The editing that you do will however be temporary as it is not server-sided. You can also save the modified website through your browser by File>Save. This works on all common web browsers including Chrome, Firefox, Opera and Internet Explorer.

Friday 14 February 2014

Simple Trick To Convert A Webpage To PDF File


webpage as pdf
In this post i will teach a simple trick or browser feature that let you convert any web page into PSD file format, which might help you to read your favourite articles offline. So lets get started.

How To Save Web Page To PDF File ?

1. Open the Google Chrome Browser on your PC or MAC 
2. Then go to the web page that you want to convert as a PDF. 
3. Now press Ctrl+P on Windows PC or Command+P if you are on a Mac to Open the the Print dialog on Chrome Browser. 
4. Now Change the destination to “Save As PDF” and hit the save button.
5. The current web page will instantly be downloaded as a PDF document. 


Tuesday 11 February 2014

How to Install Google Analytics on Blogger


Google Analytics Blogger LogoWouldn’t it be nice to know how many people actually visited your blog each day? How about knowing which of your posts are the most popular? Well surprisingly Blogger doesn’t currently offer any native blog analytics but fortunately there is Google Analytics — available for free.
Google Analytics is a great tool that will show you all sorts of useful information about how people found your blog, keywords they searched on to find you, where they came from and even how long they stayed. You’ll learn more about where your visitors come from and how they interact with your blog. This is a must tool if you are trying to build a profitable blog otherwise you are flying blind!
This article will show you how to add Google Analytics to your Blogger blog. It’s a fairly simple process and doesn’t require any technical skill at all.

Step #1 – Setup a Google Analytics Account

Go to Google Analytics and sign in using your Blogger login. If your account doesn’t work for some reason, you can create a new one instead. Once you login you’ll see a screen that looks like this:
Google Analytics Blogger Sign Up Step 1
Click on the “Sign Up >>” button and proceed to the next step which will ask you for your general information. Website URL, Account Name, Country, and Time Zone. The screen will look like this:
Google Analytics Blogger Step 2
If you noticed, I just put my Blogger url (without the http://) and called it “David’s Account” because this is your top-level container for 1 or 100 different websites so it’s a good idea to name it something more general. The next step will ask you for your contact information which includes your first name, last name, phone number, and country. Easy so far right? :-)
Google Analytics Blogger Step 3
Your last step in signing up will ask you to accept the user agreement terms and conditions which you should read (just kidding…who actually ever reads these entire legal terms anyhow?).
Google Analytics Blogger Step 4
Now this next screen is very important. This is the code you will need to copy and paste into your blogger template. Go ahead and click into the box and it will automatically highlight the entire block of code for you. Now you need to copy that code and paste it into notepad or into a MS Word document. Save it as you’ll need to use it later.
Google Analytics Blogger Step 5
After you click on the “continue >>” button you will be taken to your brand new Google Analytics dashboard! You will see your blogger blog listed but with no analytical data….yet.
Google Analytics Blogger Dashboard
Ok, now you are done with setting up your Google Analytics account. The next step is placing the tracking code into your Blogger template so it can report back to Google Analytics and provide you with some cool data points.

Step #2 – Adding GA Tracking Code to Your Blogger Template

This is not a very difficult step even if you are afraid to touch your template code. Login to your Blogger account and then click on the “Layout” => “Edit HTML” tabs. This will bring you to the template code. Before you make any changes, I advice you to back up your template just in case there are any problems. After you’ve done so, continue reading.
Now in the edit template html code window, scroll all the way to the bottom of your template code and look for the </body> tag. There should only be one of these closing tags in your template. If you can’t find it then your template wasn’t properly created and you should add one right above the </html> tag.The </html> tag should always be your last line of code in your template. It signifies the end of your template.
Ok, now go back to the code you saved before in a Word Doc from Google Analytics. You are going to copy it and paste it right above the </body> tag as illustrated in the image below. The yellow highlighted code is the new GA code I just pasted into my template.
blogger google analytics code 2
Save your template and you shouldn’t get any error messages. If you do, it’s most likely not related to this GA code and something else with your template itself. Assuming you’ve been successful with your save, you are all done embedding the GA code in your template!

Step #3 – Confirm Google Analytics is Tracking

Go back into your Google Analytics account and look at your dashboard. Most likely you will see a little yellow exclamation mark under the “status” column that looks like this: google analytics tracking not installed. This means everything isn’t working properly yet which is fine because we are about to tell GA we just added the code. From your dashboard, click on the “edit” link which is located to the far right.
Google Analytics Blogger Dashboard Edit
After you click on that link, you’ll see another screen like below. It will say “Tracking Not Installed” followed by a link “Check Status”. You’ll want to go ahead and click on that link which will tell GA to visit your site and look for the new code you just pasted in your template.
Google Analytics Blogger Dashboard Check Code
Assuming you pasted the code in there as instructed above, GA will find the new code and begin tracking everything on your blog. If you are still having problems, it’s most likely something to do with GA and you should read their help guide to troubleshoot your problem.
Google Analytics Blogger Dashboard Success
The message seen here, “Waiting for Data” means you have correctly setup GA and data is being gathered! Click on the top left Google Analytics logo and it will take you back to your dashboard. From there click on the “View report” link and that’s where all your very important Blogger visitor data will start appearing!
Google Analytics Blogger Dashboard Results
Now it usually takes an hour or so before you will see any data (maybe longer if you don’t get much traffic to your blog) so please be patient. Trust me, you’ll be logging in at least once a day just to see how much traffic your blog is getting. It’s very addicting and powerful information to learn from. You’ll be surprised which posts are your most popular and what countries people are coming from to read your blog.
Google Analytics is very powerful and we have just learned how to install it into your Blogger template. We haven’t even scratched the surface on the features and reporting it can do. For most Bloggers, this will be enough. Data will be collected and you will just review it. Others with more in-depth goals (like selling products or services, creating a sales funnel, etc) will want to spend more time learning GA. Hope you enjoyed the tutorial and don’t blame me for your new found addiction!

list of high page rank auto approved dofollow .edu backlinks


Do folks apprehend the worth of high page rank dofollow blogs. Dofollow blogs lists ar most needed things in seo. High page rank dofollow backlinks ar key of success. It will increase you page rank. it'll certainly assist you to urge most of free guests and readers.
As we tend to come back to grasp high page rank dofollow blogs commenting is essential to success. It improves your google ranking and Author Rank in addition. Then at a similar stage we must always apprehend the worth of .edu backlinks. .edu backlinks ar regarding ten times additional valuable backlinks then the other. the matter starts , the way to notice high page rank dofollow .edu backlinks?
As you discover the list and begin commenting, most of .edu blogs owner do not aprove you comments. Then what must you do? I got an answer of it.

I have an inventory of motor vehicle Aprove dofollow high page rank blogs list. You dont got to get distressed regarding aproval. you simply got to comment and acquire aproved. All the backlinks ar from motor vehicle aprove (AA) blogs. currently use them as you would like to use.
Auto Aprove (AA) Dofollow .Edu Blogs LIst
I,m sharing alittle list of motor vehicle Aprove high page rank dofollow .edu blogs. in order that you'll get aprove by your own. in order that you'd use your keywords and acquire all the benifits
http://schoolphcedu
http://cddig.scriptsmit.edu/dir
http://blog.libumnedu
http://www.pro


http://schoolphcdutw/~amps/
http://school.phcedutw/~amp
http://gcbcunionbrands-lost-in-translatio
http://jointhepridepagestcnj.edu/2010/11/23/freshman-orientatio
http://wwwsantabarbaraedubo/formato-hoja-de-inscripcion-campeonato-2012/
http://evpalmamyapcedu.ph/wordpress/category-2/photography
http://webcolbyedu/built-environment/2012/04/09/lamppost-47/
http://colegioideoedu.mx/web/?p=1
http://blog.libmnedu/chri1010/msp/117
http://jointhepridepagestcnjedu/2010/11/23/freshman-orientation/
http://polyculturmetodedu-resourseasia/etnopedagogika-kak-sotsiokulturnyiy-fenomen/
http://rawsdcrmiteduau/~s3329672/blog2/?p=114
http://ipetrickistpsuedu/blog/?p=43
http://schoolphcedutw/~amps/blog/2011/?attachmen
http://polyculturnauka.du-resourse.asia/soderzhanie-vospitaniya-i-zadachi-liberalizatsii
http://wwwentreriosedu.ar/escuelasconectadrodaje-rio-nuestro-escena-5/
http://blogsscuedu/psykes/photos/rhpm-kidz_po
http://schoolphcedu.tw/~amps/blog/2011/?attachm
http://perekrestokksominskeduby/de/2012/03/20/belaruski-vyanok/
http://hbarzj.educn/~lydeng/blog/?p=34
http://schoolphcedutw/~amps/blog/2011/?p=142
http://webolbyedu/built-environment/2012/04/09/stuck-in-the-middle-with-you-miller/


If i might see a decent responce from you folks. I,ll share additional .edu dofollow links that will be motor vehicle aprove. And you may get fruits from it. keep in-tuned if these high page rank dofollow .edu links would be helpful for you. Good Luck.

Monday 10 February 2014

Access Facebook on any Mobile Without The Internet

Do you have an old phone like Nokia 1100 ???

Don’t Worry You can Use Facebook in it
Here is an Article about it read it and rate.

Do you have an old phone like Nokia 1100, and no reader can do more than just a phone? Or are you stuck in a remote place where no internet or any other form of data (EGDE/GPRS/3G) and the link?
This is not a problem. You can continue with your Facebook in India (# * or Lithuanian) by dialing * 325 # on your mobile phone – this service requires no data or Internet plan that will work on phones from the Stone Age.
A brief overview here:


Use Facebook without the Data Plan
Facebook India has partnered with Fonetwish to bring Facebook on every mobile phone without requiring any apps or even the Internet.
In partnership with Fonetwish Facebook India to take any phone or the Internet without running the program.

Dial # 325 number, enter the username and password, select Facebook and use Facebook, there are some basic commands to perform various tasks, online to chat with friends at home and new additions to the list of your friends and more

If the interface to the Unix shell, such as Facebook, and will be very similar. Fonetwish says the service now, Airtel, Aircel, Tata DoCoMo and the idea is not accessible by users in India.

Reasonable prices – you only need to pay 1.00 fee per day for unlimited access.


Thanks for coming by and taking your time to read this post :) I hope you have learnt something today. Now I'd love to hear from you. Got any views, thoughts and questions related to the post? I'm all ears here. Add your comment.

How to Make Video Look Back on Facebook

 Look Back Facebook is an offering made ​​by Facebook social network users in the form of a video trip to the timeline for 4 years back. It is presented in the context of facebook birthday 10th precisely dated February 4, 2014. Perhaps the last few days on the facebook page often see posts from our friends titled Here's my Facebook movie. And when the link is clicked it will show the video of our friend containing a photo, status, photos ever shared and others that fit with the music makes the video looks beautiful.


Perhaps you are wondering how to make it? whether to use the software as a video maker? or should install certain applications on your facebook? ternyta all the wrong answers. It is very easy and does not need any expertise related to the making of the video. You only need to visit a specific page and the system automatically in the facebook will make your video look back over 4 years back.


There is a record that must be kept in mind that could make facebook look back this is the only photo files and shared a lot of his status, because if you are too private then auto-generate this look back will not work. Curious how the following steps:


  • First of course you must already have a Facebook account
  • Then login
  • Then click the following link https://www.facebook.com/lookback/
  • See what happens, let the process run will see your video look back
  • Click the Share Your Movie to appear in your timeline
  • When you do not want to appear so do not need to click Share Your Movie
  • Done, easy right
That's it you have made the look back video. Share it with your friends ..


Thanks for coming by and taking your time to read this post :) I hope you have learnt something today. Now I'd love to hear from you. Got any views, thoughts and questions related to the post? I'm all ears here. Add your comment.

Sunday 9 February 2014

How To Convert Your Facebook Page Into A Website


Many  Lots of people having Facebook page. Almost every bloggers also have a FB page. Here are lots of people who contain a popular Facebook page but don't have any website. If you are one of them then you can easily make a website just in a minute with your FB page. A simple tool called EXAI is available that allows users to turn your Facebook Page into Website or Mobile site free of cost with some clicks.

Features:

1. A Website in 1 Click
2. Matching Mobile Site
3. Easy to use interface
4. Free SEO
5. Free Hosting
6. Hire Professionals
7. Amazing Photo Effects
8. Lots of Widgets

For making a website just click on this link exai.com and go to website. Here click on start and Just do 3 simple steps. The free site URL will be www.xxxxxx.exai.com, if you want to set your own custom domain name to your website go to pricing options.

Saturday 8 February 2014

HOW TO GET .COM,.ORG.NET DOMAIN NAMES FOR FREE


HI FRIENDS,

TODAY I BROUGHT YOU A NEW TRICK THOSE WHO HAVE WEBSITES
FreePremiumDomain IS A WEBSITE TO GIVES DOMAIN NAME FOR FREE.
TO GET THIS BENFIT THEN FOLLOW THESE STEPS
1.>>>>>FIRST GO TO THIS WEBSITE FreePremiumDomain
AND REGISTER 
2.>>>>>THEY WILL ASK WHICH OFFER YOU WANT.
TWO OPTIONS .
       1,IF YOU WANTO GET ONLY ONE DOMAIN NAME FOR YOU WEBSITE T HEN SELECT FIRST OPTION.YOU WANTO REFER 9 FRIENDS TO GET A DOMAIN NAME FOR FREE
2,IF YOU WANT TO GET TWO DOMAIN NAMES FOR FREE THEN SELECT THE SECOND OPTION .BUT YOU WANT TO REFER 16 FRIENDS TO GET THIS DOMAIN


3.>>>>>>>>>>AFTER REGISTERING ON THIS WEBSITE THEY WILL ASK YOU TO CONFIRM YOUR EMAIL 
4.>>>>>>>>>>AFTER CONFIRMING YOUR EMAIL YOU CAN SEE YOUR REFERAL LINK IN YOUR ACCOUNT MY REFERAL LINK IS http://www.FreePremiumDomain.com/?r=608332
4.>>>>>>>>>POST IT ON FACEBOOK OR YOUR WEBSITE OR OTHER SOCIAL NETWORKS
AFTER REFERING FRIENDS AS THEIR OFFER YOU WILL GET A DOMAIN NAME 

Friday 7 February 2014

Monetize Your Blog With Media.net - The best Adsense alternative


In this day.We are discussing about Media.net

You don’t have an AdSense account ? or your AdSense account is being disapprooving agin and again ?

Then media.net is perfect for you ! Media.net is yahoo Bing advertisement network. Well my AdSense account was disabled because I have added the ads in my hacking blog. so I have decided to get AdSense when our blog get 50k alexa rank.Well  media.net is best answer for AdSense alternative and in short, I can say Media.net is better than AdSense because they are not cruel with their publishers !
In AdSense if you violate any terms and conditions then next day your account will be disabled ! Well now a days I am using media.net and I am very satisfied with the revenue.They are very honest to their publishers.

TUTORIAL TO SED FACEBOOK FRIEND REQUEST WHEN FRIEND REQUEST ARE BLOCKED

MANY PEOPLE ASK HOW TO SEND FRIEND REQUEST WHEN IT IS BLOCKED SO HERE'S THE ANSWER "

Facebook friend request sent when blocked

Guyz.. If ur friend request is Blocked Don't Worry we are here ...

Imagine that you are blocked from
sending Friend Requests by Facebook
for 2, 4, 7, 14 or even worse 30 days!

 
That would be a really serious problem
if you actually wanted to add someone
during that period. Now, you can! With
this simple trick you can send 1000's of
friend requests when when you are
blocked . There's just one part which
will be tough for you if you are going to
add unknown people. You will need the
Email address of the person you want to
add.
If u r thinking of
adding too many people then it would
be better that you create a contactfile.
For the people who don't know the
easiest way to create a contact file, here
  1. Open a New text document (.txt) in Notepad.
  2.  Add all the email addresses separated by a comma (' , ').
  3. Now save that file with the extension .vcf
Now, this new file is your contact file.
Upload it to Facebook and you will be
prompted to send friend request.
 Click
'OK' and that's it, you're done!
 
Simple yet effective!

Wednesday 5 February 2014

Trick to send mass messages on Facebook


On Facebook sometimes people need to send any information or messages in bulk,like many time when anyone organize any event and change the place or timing etc., then they need to inform all guests, and if you  do it by message sending feature available on Facebook then you can add only 20 people at most at a time, which is also very annoying and time consuming.


Now i am gonna tell about a very simple trick, by which you can send messages to hundreds of thousands of people just in one time.

This trick uses the event invitation feature, though some times before you can free to send mass messages to all guests, but sometimes before facebook has changed some settings and now you can only send updates (not inbox message) that shows to the guest under 'updates' section of 'messages'.. about which people dont get any notification and  they dont look at it generally.

So here is a  trick  by which u can send your messages in inbox to all guests :)

Follow the process to send bulk messages on Facebook :

1. Create a Facebook Event

2. Invite Hundreds of thousands of guests.

3. Now for sending message to all guests, login into mobile version of facebook through link m.facebook.com

4. Now go to More> Events as shown in image


5. Now open event  you created and go down, Now under section 'send message to' choose 'all' if u want to send message to all guests, or you can choose any one from 'Attending / may be attending / not attending'.
and compose your message and  send it.

Now  your all guests will receive your message in their inbox with message notification at their FB home page :)

10 Services To Send Text Messages From The Web


Sometimes you need to send a text message, but you forgot your phone, or you have poor cell reception, so what can you do? Or you just prefer the comfort of the full keyboard to the crammed one on your phone? No problem, we've got 10 sites to help you get started with staying in constant contact with your friends, families and even your customers.
    http://www.bloove.com/
Bloove.com - Get your phone contacts on the Bloove site, and then log in and manage them as well as send them text messages directly from the site.
    http://www.clearsms.com/
ClearSMS.com - A professional SMSing service for businesses to send out mass messages to their customers to alert them about specials and sales. All messages are assigned a value in credits an you purchase more as needed.
    http://gizmosms.com/
GizmoSMS.com - GizmoSMS lets you send texts to users in over 50 countries an a slew of carriers inside each of those. While it is free to use, it does not allow space for identifying yourself except inside the body of the text.
    http://www.group2call.com
Group2Call.com - Allows you to import your contacts, break them up into groups and send all the free texts you want to them. Also offers the chance to broadcast voice messages, but you have a limited supply of those.
    http://www.jaxtr.com
Jaxtr.com - This one requires the person you wish to text to have the widget (like the one pictured above) installed on their blog or social networking profile, but if it's there, you can text the member if they live in one of any 38 countries.
    http://www.ohdontforget.com/
OhDontForget.com - Not only can you text people, you can schedule them for later delivery.
    http://www.smsgupshup.com/
SMSGupShup.com - A system to allow you to send one text message to a number and they will then resend it out to every member that belongs to your group, up to 5,000 people in size.
    http://www.swaggle.mobi/sessions/new
Swaggle.mobi - A service for small groups to SMS each other at once; accessible via iPhone as well as by the web.
    http://www.yellowpipe.com/yis/tools/sms/send_sms.php
Yahoo Mobile - Yahoo Mobile lets you send and receive phone text messages; you will not be charged for sending the SMS; but the recipient might be charged the standard messaging rates for receiving or replying.
    http://www.yellowpipe.com/yis/tools/sms/send_sms.php
Yellowpipe - Mainly a web host, but they happen to offer a quick and easy SMS feature when you just have to get out a text quickly. They do allow you to enter a return number.

Tuesday 4 February 2014

NetTraffic: display network traffic information on the Windows desktop


If you want to find out how fast you are downloading or uploading in Windows, you will notice that it is not really that easy to find out. While some third party programs display those information to you in their interface, Windows itself seemingly does not make available any of those information to you directly.
Windows offers tools that display your network's activity but you need to know where to look. You can open the Task Manager with Ctrl-Shift-Esc for instance and switch to the Networking tab there, or use the Resource Monitor instead which is also highlighting all the processes that use bandwidth currently.
NetTraffic is a free alternative for Windows that you can use to display the bandwidth utilization of a network adapter.
Note: NetTraffic requires the Microsoft .Net Framework 2.0.
It adds a single icon to the Windows system tray that is highlighting if upload or download bandwidth are used currently. When you hover over the icon, the current upload and download speed is listed in a small notification window.
nettrraffic
A click opens the traffic graph that stays there until you click it away again. The always on top graph highlights the upload and download bandwidth in absolute numbers and as a graph. You can disable the always on top nature of the window though if you want with a right-click and the selection of Always on top in the context menu. Here you can also open the program's preferences.
nettraffic preferences
The application uses all network interfaces by default. If you only want to monitor one or some, you can modify that here in the preferences. Here you can also modify the update interval which is set to 1000ms by default and change the colors that are used to paint the chart information on the screen.
The statistics window displays several interesting information. It not only displays the yearly, monthly, daily and hourly bandwidth utilization of the selected network adapters, but also a prognosis and average values.
You need to run the network traffic monitor for a while on the system as the accuracy will increase significantly over time.
The statistics window offers charts as well that you can make use of to display the traffic utilization for a given time frame in the window. Information can be displayed as graphs or in a table, with options to export data into an xml file.

Verdict

If you want to monitor your system's bandwidth over time, then this is one of the tools that you can use for the purpose. If you need information about the bandwidth of individual processes, try NetLimiter Monitor.

Find out if your computer acts as a Skype Super-Node


Bandwidth usage can be extremely different for Skype users which can be attributed whether computers are being used as Skype Super-Nodes. A Super-Node is basically a computer that is running Skype and not preventing the software access to the ports 80 and 443 which are used to route traffic from other Skype users who are behind a protected system.
The major problem with being a Skype Super-Node is that the bandwidth usage per hour will be much higher which might cause concern for users with Internet accounts that are having bandwidth limitations.
A great way for finding out if your system is being used as a Skype Super-Node is by installing a software that logs the bandwidth usage of Skype when the application is running. One tool that can do that is the trial version of Netlimiter which can be used for 30 days before it has to be registered.
Netlimiter logs all incoming and outgoing connections and their traffic consumption and it is possible to display the traffic consumption of a specific application as well.
skype traffic
The best way in my opinion to find out if Skype is acting as a Super-Node is to start it and let it run for a few hours without using it actively. Bandwidth consumption is obviously higher if you make calls or transfer data with Skype and it is more difficulty to find out if Skype is acting as a Super-Node if you have to analyze the traffic in direct and indirect traffic.
The above screenshot is showing the incoming and outgoing Skype bandwidth for most of today and as you can see it's less than 500 Kilobyte. Super-Nodes can use hundreds of Megabytes.
The easiest way to prevent Skype from being a Super-Node is to block access to the ports 80 and 443 in Skype. You can do that under Tools > Options > Connections. Just uncheck the option "Use port 80 and 443 as alternatives for incoming connections".

Netlimiter 2 Monitor


Do you know which applications and processes connect to the Internet on your computer ? If you use a firewall chance is that you had to define rules to allow certain programs the right to connect to the Internet. Sometimes however users think of this as a burden and use low security settings to prevent that they are being pestered all day with questions from their firewall.
The result? All programs can connect freely to the Internet. While most certainly do so legitimately, for instance to download updates or to display websites, others may be sending data about your computer to a server on the Internet or even steal files from it.
Netlimiter 2 Monitor is a sweet software that displays all open processes and applications on the system detailing their incoming and outgoing bandwidth along with ports, IP addresses and process numbers. That's basically the same amount of information that my previous favorite Currports is displaying but with the addition of bandwidth which CurrPorts is not displaying.
The first difference is that Netlimiter Monitor has a history feature where it is displaying which applications have connected to the Internet before on your system. Great for quickly checking out if an app is among the list that should not be there. Note that the history only dates back to the date you have installed Netlimiter on your system and not before that time.
traffic stats
It's definitely a great application if you want to evaluate the bandwidth usage of a process or software. I used it to keep an eye on Skype to see if my computer was used as a Skype supernode.
Both the Lite and Pro version are not free while NetLimiter Monitor is. The lite version supports setting limits for programs which the Monitor application does not.
The Pro version of Netlimiter adds some interesting functions like Traffic Shaping, Network support, Network Tools like Whois and Traceroute, Remote Administration and Advanced Rules that the two other versions do not support at all.
The program is available as a 32-bit and 64-bit version for all supported versions of the Windows operating system. Note that you need to register the product for free on the developer website.

How to block people on Google+ from emailing you 7BE3DQXW6U4C


email via google+
One of Google's primary goals, besides knowing more about you than your better half, is to integrate the company's Google+ service into its other services.
Since Google+ is not as popular as Facebook, some say it is a ghost town but that has changed a bit over the past year or so, Google attempts to increase its popularity by making it mandatory for many of the company's other products.
Just recently, Google+ commenting was rolled out on YouTube, the world's most popular video hosting platform, and while Google claimed it would improve the commenting culture on the site, it actually made it worse.
Yesterday the company announced that it has started to integrated yet another feature to make Google+ more appealing to users.
The new Gmail integration means that anyone on Google+ can email you even if they do not know your email address. While your email address is not shared with those people directly, it means that anyone who has a connection to you on the site, meaning has you in their circles, can send you an email without knowing your address.
This works only on the Gmail web client for know and not on other clients (e.g. the mobile app). As long as someone on Google+ has you in one of their circles, they can mail you.
If you have enabled the new Gmail inbox category system, then you will notice that messages from primary contacts, people you have in your circles, land in the primary folder on Gmail. Messages from people that you do not have in your circles land in the social category instead.
If an email arrives, you can decided to block future messages, allow future messages, or report spam and abuse.
The issue
This looks great on paper, as it improves the message sending (even though you could just fire off a private message instead).
We have identified two issues with the new system.
  • First, it is opt-out, meaning that it is enabled by default.
  • Second, since anyone can email you, you may see an increase in spam or other unsolicited emails.
The fix
You can disable the feature on Gmail. To do so, open the settings on the Gmail website. Here you find the new Email via Google+ option which defines which people can email you via your Google+ profile.
The default is set to anyone, which you can change to extended circles (meaning your connections and their connections), your circles, or no one.
If you set the preference to no one, you effectively eliminate the possibility that someone on Google+ uses the new feature to send you an email.
They may be able to contact you in other ways though on the site itself, for instance via the site's own "send a message" feature that you find on profile pages.

7BE3DQXW6U4C

Unshorten: speed up the opening of short urls on Android


Whenever you try to load a short url resource on Android, one that will redirect you to the original address in the process, you will be taken to the system's default browser first before you are taken to the native application handling those links.
Say, you spot a link on Twitter that points to Instagram. Without Unshorten, activating that link opens your web browser of choice first, where the link is expanded before it can be opened in the native app.
With Unshorten, the link on Twitter is automatically resolved so that it is directly opened using the native Instagram application.
Here is how it works in detail.
Once you have installed the Unshorten application on your Android device, supported are all versions of the operating system from 2.2 on, you will notice that it adds itself as a potential handler for select short url services such as those used by Reddit, Instagram, Twitter, Google, Facebook, WordPress or The Verge.
unshortenshort-urls
When you tap on a supported short url, a "complete action using" screen is displayed to you. Here you need to select Unshorten from the list of available options. You can use the service only this one time, or select the Always option to make it the default handler for these types of links permanently.
You can tap on sample links that the application lists when you start it to make it the default handler for these types of links.
The core benefit that Unshorten provides you with is speed. Once you have configured your Android device to open those links using the application, you will save time each time such a link gets opened on your system as the web browser middle-man is bypassed automatically.
So who is this for?
If you run native apps for supported services, say Instagram or Twitter, and come into contact with short urls regularly, you will benefit from Unshorten as it speeds up the process of opening those links for you.
Unshorten supports a wide variety of online services that make use of short url services, and more are added by its author regularly so that any missing ones will be available eventually. If you use at least one of those services natively, and come in contact with short urls of that service, then it is very likely that you will find this app useful.

Translate