Showing posts with label TIPS AND TRICKS. Show all posts

Friday 7 February 2014

TUTORIAL TO SED FACEBOOK FRIEND REQUEST WHEN FRIEND REQUEST ARE BLOCKED

MANY PEOPLE ASK HOW TO SEND FRIEND REQUEST WHEN IT IS BLOCKED SO HERE'S THE ANSWER "

Facebook friend request sent when blocked

Guyz.. If ur friend request is Blocked Don't Worry we are here ...

Imagine that you are blocked from
sending Friend Requests by Facebook
for 2, 4, 7, 14 or even worse 30 days!

 
That would be a really serious problem
if you actually wanted to add someone
during that period. Now, you can! With
this simple trick you can send 1000's of
friend requests when when you are
blocked . There's just one part which
will be tough for you if you are going to
add unknown people. You will need the
Email address of the person you want to
add.
If u r thinking of
adding too many people then it would
be better that you create a contactfile.
For the people who don't know the
easiest way to create a contact file, here
  1. Open a New text document (.txt) in Notepad.
  2.  Add all the email addresses separated by a comma (' , ').
  3. Now save that file with the extension .vcf
Now, this new file is your contact file.
Upload it to Facebook and you will be
prompted to send friend request.
 Click
'OK' and that's it, you're done!
 
Simple yet effective!

Wednesday 5 February 2014

Trick to send mass messages on Facebook


On Facebook sometimes people need to send any information or messages in bulk,like many time when anyone organize any event and change the place or timing etc., then they need to inform all guests, and if you  do it by message sending feature available on Facebook then you can add only 20 people at most at a time, which is also very annoying and time consuming.


Now i am gonna tell about a very simple trick, by which you can send messages to hundreds of thousands of people just in one time.

This trick uses the event invitation feature, though some times before you can free to send mass messages to all guests, but sometimes before facebook has changed some settings and now you can only send updates (not inbox message) that shows to the guest under 'updates' section of 'messages'.. about which people dont get any notification and  they dont look at it generally.

So here is a  trick  by which u can send your messages in inbox to all guests :)

Follow the process to send bulk messages on Facebook :

1. Create a Facebook Event

2. Invite Hundreds of thousands of guests.

3. Now for sending message to all guests, login into mobile version of facebook through link m.facebook.com

4. Now go to More> Events as shown in image


5. Now open event  you created and go down, Now under section 'send message to' choose 'all' if u want to send message to all guests, or you can choose any one from 'Attending / may be attending / not attending'.
and compose your message and  send it.

Now  your all guests will receive your message in their inbox with message notification at their FB home page :)

10 Services To Send Text Messages From The Web


Sometimes you need to send a text message, but you forgot your phone, or you have poor cell reception, so what can you do? Or you just prefer the comfort of the full keyboard to the crammed one on your phone? No problem, we've got 10 sites to help you get started with staying in constant contact with your friends, families and even your customers.
    http://www.bloove.com/
Bloove.com - Get your phone contacts on the Bloove site, and then log in and manage them as well as send them text messages directly from the site.
    http://www.clearsms.com/
ClearSMS.com - A professional SMSing service for businesses to send out mass messages to their customers to alert them about specials and sales. All messages are assigned a value in credits an you purchase more as needed.
    http://gizmosms.com/
GizmoSMS.com - GizmoSMS lets you send texts to users in over 50 countries an a slew of carriers inside each of those. While it is free to use, it does not allow space for identifying yourself except inside the body of the text.
    http://www.group2call.com
Group2Call.com - Allows you to import your contacts, break them up into groups and send all the free texts you want to them. Also offers the chance to broadcast voice messages, but you have a limited supply of those.
    http://www.jaxtr.com
Jaxtr.com - This one requires the person you wish to text to have the widget (like the one pictured above) installed on their blog or social networking profile, but if it's there, you can text the member if they live in one of any 38 countries.
    http://www.ohdontforget.com/
OhDontForget.com - Not only can you text people, you can schedule them for later delivery.
    http://www.smsgupshup.com/
SMSGupShup.com - A system to allow you to send one text message to a number and they will then resend it out to every member that belongs to your group, up to 5,000 people in size.
    http://www.swaggle.mobi/sessions/new
Swaggle.mobi - A service for small groups to SMS each other at once; accessible via iPhone as well as by the web.
    http://www.yellowpipe.com/yis/tools/sms/send_sms.php
Yahoo Mobile - Yahoo Mobile lets you send and receive phone text messages; you will not be charged for sending the SMS; but the recipient might be charged the standard messaging rates for receiving or replying.
    http://www.yellowpipe.com/yis/tools/sms/send_sms.php
Yellowpipe - Mainly a web host, but they happen to offer a quick and easy SMS feature when you just have to get out a text quickly. They do allow you to enter a return number.

Tuesday 4 February 2014

NetTraffic: display network traffic information on the Windows desktop


If you want to find out how fast you are downloading or uploading in Windows, you will notice that it is not really that easy to find out. While some third party programs display those information to you in their interface, Windows itself seemingly does not make available any of those information to you directly.
Windows offers tools that display your network's activity but you need to know where to look. You can open the Task Manager with Ctrl-Shift-Esc for instance and switch to the Networking tab there, or use the Resource Monitor instead which is also highlighting all the processes that use bandwidth currently.
NetTraffic is a free alternative for Windows that you can use to display the bandwidth utilization of a network adapter.
Note: NetTraffic requires the Microsoft .Net Framework 2.0.
It adds a single icon to the Windows system tray that is highlighting if upload or download bandwidth are used currently. When you hover over the icon, the current upload and download speed is listed in a small notification window.
nettrraffic
A click opens the traffic graph that stays there until you click it away again. The always on top graph highlights the upload and download bandwidth in absolute numbers and as a graph. You can disable the always on top nature of the window though if you want with a right-click and the selection of Always on top in the context menu. Here you can also open the program's preferences.
nettraffic preferences
The application uses all network interfaces by default. If you only want to monitor one or some, you can modify that here in the preferences. Here you can also modify the update interval which is set to 1000ms by default and change the colors that are used to paint the chart information on the screen.
The statistics window displays several interesting information. It not only displays the yearly, monthly, daily and hourly bandwidth utilization of the selected network adapters, but also a prognosis and average values.
You need to run the network traffic monitor for a while on the system as the accuracy will increase significantly over time.
The statistics window offers charts as well that you can make use of to display the traffic utilization for a given time frame in the window. Information can be displayed as graphs or in a table, with options to export data into an xml file.

Verdict

If you want to monitor your system's bandwidth over time, then this is one of the tools that you can use for the purpose. If you need information about the bandwidth of individual processes, try NetLimiter Monitor.

Find out if your computer acts as a Skype Super-Node


Bandwidth usage can be extremely different for Skype users which can be attributed whether computers are being used as Skype Super-Nodes. A Super-Node is basically a computer that is running Skype and not preventing the software access to the ports 80 and 443 which are used to route traffic from other Skype users who are behind a protected system.
The major problem with being a Skype Super-Node is that the bandwidth usage per hour will be much higher which might cause concern for users with Internet accounts that are having bandwidth limitations.
A great way for finding out if your system is being used as a Skype Super-Node is by installing a software that logs the bandwidth usage of Skype when the application is running. One tool that can do that is the trial version of Netlimiter which can be used for 30 days before it has to be registered.
Netlimiter logs all incoming and outgoing connections and their traffic consumption and it is possible to display the traffic consumption of a specific application as well.
skype traffic
The best way in my opinion to find out if Skype is acting as a Super-Node is to start it and let it run for a few hours without using it actively. Bandwidth consumption is obviously higher if you make calls or transfer data with Skype and it is more difficulty to find out if Skype is acting as a Super-Node if you have to analyze the traffic in direct and indirect traffic.
The above screenshot is showing the incoming and outgoing Skype bandwidth for most of today and as you can see it's less than 500 Kilobyte. Super-Nodes can use hundreds of Megabytes.
The easiest way to prevent Skype from being a Super-Node is to block access to the ports 80 and 443 in Skype. You can do that under Tools > Options > Connections. Just uncheck the option "Use port 80 and 443 as alternatives for incoming connections".

Netlimiter 2 Monitor


Do you know which applications and processes connect to the Internet on your computer ? If you use a firewall chance is that you had to define rules to allow certain programs the right to connect to the Internet. Sometimes however users think of this as a burden and use low security settings to prevent that they are being pestered all day with questions from their firewall.
The result? All programs can connect freely to the Internet. While most certainly do so legitimately, for instance to download updates or to display websites, others may be sending data about your computer to a server on the Internet or even steal files from it.
Netlimiter 2 Monitor is a sweet software that displays all open processes and applications on the system detailing their incoming and outgoing bandwidth along with ports, IP addresses and process numbers. That's basically the same amount of information that my previous favorite Currports is displaying but with the addition of bandwidth which CurrPorts is not displaying.
The first difference is that Netlimiter Monitor has a history feature where it is displaying which applications have connected to the Internet before on your system. Great for quickly checking out if an app is among the list that should not be there. Note that the history only dates back to the date you have installed Netlimiter on your system and not before that time.
traffic stats
It's definitely a great application if you want to evaluate the bandwidth usage of a process or software. I used it to keep an eye on Skype to see if my computer was used as a Skype supernode.
Both the Lite and Pro version are not free while NetLimiter Monitor is. The lite version supports setting limits for programs which the Monitor application does not.
The Pro version of Netlimiter adds some interesting functions like Traffic Shaping, Network support, Network Tools like Whois and Traceroute, Remote Administration and Advanced Rules that the two other versions do not support at all.
The program is available as a 32-bit and 64-bit version for all supported versions of the Windows operating system. Note that you need to register the product for free on the developer website.

Unshorten: speed up the opening of short urls on Android


Whenever you try to load a short url resource on Android, one that will redirect you to the original address in the process, you will be taken to the system's default browser first before you are taken to the native application handling those links.
Say, you spot a link on Twitter that points to Instagram. Without Unshorten, activating that link opens your web browser of choice first, where the link is expanded before it can be opened in the native app.
With Unshorten, the link on Twitter is automatically resolved so that it is directly opened using the native Instagram application.
Here is how it works in detail.
Once you have installed the Unshorten application on your Android device, supported are all versions of the operating system from 2.2 on, you will notice that it adds itself as a potential handler for select short url services such as those used by Reddit, Instagram, Twitter, Google, Facebook, WordPress or The Verge.
unshortenshort-urls
When you tap on a supported short url, a "complete action using" screen is displayed to you. Here you need to select Unshorten from the list of available options. You can use the service only this one time, or select the Always option to make it the default handler for these types of links permanently.
You can tap on sample links that the application lists when you start it to make it the default handler for these types of links.
The core benefit that Unshorten provides you with is speed. Once you have configured your Android device to open those links using the application, you will save time each time such a link gets opened on your system as the web browser middle-man is bypassed automatically.
So who is this for?
If you run native apps for supported services, say Instagram or Twitter, and come into contact with short urls regularly, you will benefit from Unshorten as it speeds up the process of opening those links for you.
Unshorten supports a wide variety of online services that make use of short url services, and more are added by its author regularly so that any missing ones will be available eventually. If you use at least one of those services natively, and come in contact with short urls of that service, then it is very likely that you will find this app useful.

Monday 3 February 2014

Gmail Hacks, Tips and Tricks


You already know that Gmail beats most email providers with its endless customization capabilities, Google product integration, and a fantastic spam filter. Take it to the next level with these Gmail power user tips, add-ons, and plugins.

1. Gmail Keyboard Shortcuts

If you haven’t already, master the shortcut keys to simplify the way you compose, read, archive, search, and report spam mail. Some of these may be straight forward, like c for compose, but through the shortcut menu you can learn how to navigate and organize your mailbox entirely with your keyboard.
In the same vein, Gmail users eager to simplify their experience with single keystrokes can check out Launchy: a free, open source keyword launcher that runs in your system tray and opens apps with designated keystrokes. Launchy is still “a far cry from Quicksilver for Mac” according to Gina Trapani at Lifehacker, but Adam Pash of Lifehacker says, “I can't recommend it highly enough.” Here is a quick tutorial for one-key Gmail composing through Launchy.

2. Google Code Macros

The Greasemonkey extension for Firefox, familiar to many power users, allows JavaScript functionality on any web page. Piggybacking off of this capability, the generically-named Macros script enables a number of keyboard shortcuts. Some of the shortcuts from the original script have now been implemented in the new Gmail; however, to enable the ones that are no longer functional in this newest version, users only have to install this extension. Those who have not updated to the newest Gmail can find other Greasemonkey scripts still available to enhance the older version.

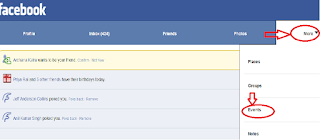
3. Bookmark Searches and Emails

With the newest version of Gmail, searches are granted their own URLs which can be bookmarked; however, those still operating under the old version, on the fence about the changes, can still generate these “baby” bookmarks for searches through this form, created by Steve Rubel. Meanwhile, all messages in Gmail have URLs, too. While the message is open, simply type CTRL-D to bookmark it.

4. Resize Composition Box

The aptly-named Resizeable Textarea Firefox extension allows you to click and drag the bottom right corner of the text box you’re typing in without resizing your browser window. This add-on will operate not only in Gmail, but also in any forum or discussion board where the textbox is too small for an appropriate response – especially one that you may want to read over before sending. Note that any browser built with the newest Opensource.org web kit will already have this capability. For more browser info, check out the Internet software category.
Resize Composition Box

5. Change Your Inbox Focus

Everyone knows that you can enter tasks, set appointments, and manage your calendar through your Gmail account. Now Chrome and Firefox users alike can install the ActiveInbox plugin in order to optimize Gmail for productivity. Building upon Gmail’s priority inbox feature, this plugin allows you to sort emails according to tasks, set reminders that can be snoozed or dismissed, and create project folders and sub-folders. It also enables a note section on emails for important personal reminders. Additionally, it implements the Previous Conversation Viewer, pulling up a history of emails between you and the sender (or recipient), allowing you to reflect on past comments and respond faster.

6. Streamline Adding Attachments

If you’ve ever sent an important attachment, chances are that you’ve also experienced the embarrassing reply message stating you’ve neglected to attach the aforementioned file. This Greasemonkey script scans all messages for references to attachments including variations such as “attached” or “attachment.” When you click send on a message with such references that is missing an attachment, a prompt will pop up asking you to confirm whether your email is ready to send.
Streamline Adding Attachments 
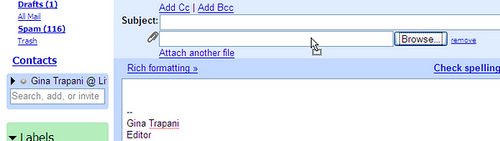
To make matters even simpler, wouldn’t it be great if you could drag files directly into your email? Check out the Firefox extension dragdropupload which allows you to do exactly that if you are running Firefox 3.0 or newer. Once installed, you can simply click and drag the file – or multiple files at once – from a folder or the desktop and drop them onto the “Browse” button to attach.

7. Secure Gmail & Avoid Spam

The Firefox add-on OptimizeGoogle (which is based on an abandoned add-on called CustomizeGoogle) enhances both Google searches and your Gmail experience. Specifically in terms of Gmail, it enables secure browsing in emails and the calendar, hides the counter on your Spam folder, and uses a fixed font for the body of emails. Ultimately, while securing your experience, it provides a cleaner look to your inbox. Meanwhile, when using the search engine, this add-on enables URL previews on sponsored links, removes ads, removes click tracking, and adds a counter to search results among other features. If your primary concern is that irritating and eternally growing Spam counter, however, you may be better off just trying out this Greasemonkey + Firefox script to keep it out of sight.

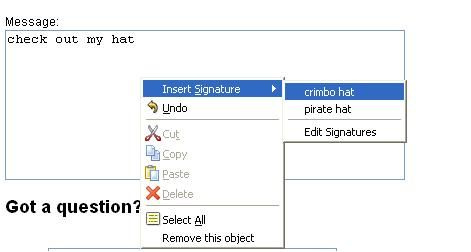
8. Automate Frequently Repeated Text

Signature functionality is built into Gmail, but frequently typed phrases can be automated with Firefox extension Signature, which allows you to insert designated text with a keystroke. Note that, as of right now, Signature is not yet compliant with Firefox 9.0.1. Also try the Windows app, AutoHotKey, or the Mac app: TypeIt4Me. Both allow you to create keystrokes to automate text in virtually any application.

9. POP3 & IMAP Forwarding

“I recommend using IMAP (where the mail is both on the server and on your local machine(s)/device(s)) and uploading all your email onto Gmail,” writes Mark Wheeler, a Gmail power user. “You can keep copies on the Google servers and your desktop/laptop/phone so that they are all efficiently accessible and available anytime anywhere. Don't have to worry about backups, or disk space...I have 25,000 emails and have only used 9% of my space!”
To upload old email like Mr. Wheeler did, set up a Gmail IMAP account in your desktop email client. In the client, establish folders that correspond to your Gmail labels, and drag and drop your non-Gmail into the folders. If you're using Outlook with .PST format or Outlook Express, you will have to convert or export the emails to mBox data file format before the messages will translate. The process may take some time. Also, the original dates and times attached to the messages will appear in Gmail as the dates and times that the messages were imported into Gmail. Click here for a tutorial from My Digital Life.

10. Mute Conversations

Ever found yourself subscribed to a mailing list and the current conversation has nothing to do with you? If you don’t want to unsubscribe, you can easily stop the friendly spam with the Gmail mute function. Select a message in the thread and hit the m key to auto-archive all incoming messages in the conversation. The thread will stay muted until you un-mute it; it will also un-mute itself if your address appears in the To or CC box.

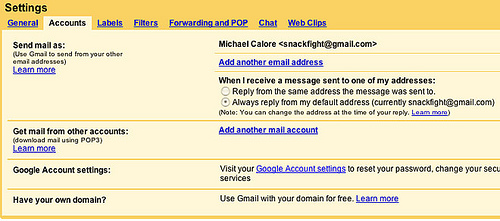
11. Keep it All in One Place

The Mail Fetcher allows you to add up to five different accounts and then both receive and send via POP3 without logging out of Gmail. Unlike a simple forwarding feature, Mail Fetcher allows synchronization of Gmail actions with the home server. Go to your Gmail Settings and open the Accounts tab, then click Add another mail account. One caveat of sending from non-Gmail accounts: the recipients may see, “FROM you@Gmail.com on behalf of you@otherdomain.com,” especially if the recipients are using a client like Outlook.
Additionally, users can use Google Toolbar and Gmail together to transform a Gmail account into a massive archive of interests. To do this, simply add the Google toolbar to your browser. When you happen across text or images you want to save, highlight them and click the Send To Gmail link.

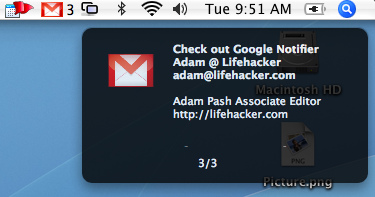
12. Gmail/Google Notifier and Desktop Plugin

Tired of constantly refreshing your browser for new notifications, install the Notifier widget to check your email (and Google Calendar, if you're a Mac user). As with almost everything else under the sun, there's also a Firefox extension that will serve the same function (it's not released by Google).


Some users have reported compatibility issues between Google Toolbar, Google Apps and Google Desktop. Everyone's configuration is different, so it's impossible to know, but Maxim Alexeyev created this Google Desktop Plug-In that efficiently replaces Google Notifier for users. The plug-in also offers multi-username functions as well as Google Apps support.
For those trying to force Gmail Notifier to use SSL, this wikihow tutorial involves hex editing. Advanced Mac users with Google Notifier may find this comment on the O’Reilly Mac DevCenter helpful as well.

13. RSS feeds & Podcasts in Gmail

This Greasemonkey + Firefox script will allow your Google Reader RSS feed to appear directly in your mailbox. Google Reader and Gmail seem to be moving closer together in functionality and interface and it's likely that they'll soon be officially integrated.
In the meantime, Gmail users can also turn emails and conversations into a comprehensive RSS feed using this syntax: https://username:password@gmail.google.com/gmail/feed/atom. Then sign up for a FeedBurner account to host and distribute it. With an RSS-to-podcast site like AudioDizer.com or one of the many options at NextUp to create text-to-speech files, users can now listen to their Gmail through an iPod or similar device. This hack is based on a tip from Mike Donaghy. For more information, check out these podcast resources.

14. Inclusive and Exclusive Labels

If you have to do a mailbox-wide search, you may already know what folders and labels to leave exempt. Instead of browsing through hundreds of search results, implement the –label: and +label: syntax to modify your search results to either exclude labels entirely (with the former), or search exclusively in a given label (with the latter). For instance, if you want to avoid your chat conversations, which are automatically filed like emails with a Chat label, add the string -label:Chat before your search terms.

15. Use Gmail as an External Hard Drive

Use up any vegetating space in a Gmail account with this Windows drive shell extension (Mac users should check out gDisk). Your Gmail space will then appear in My Computer as an external drive. When you drag and drop a file to the drive, an email is sent to your Gmail account with the file as an attachment. Note that this is a fairly old program but seems to have been updated for the latest Gmail version.


Friday 31 January 2014

How to Extract Email Addresses from your Gmail Folders

Learn how to extract unique email addresses from your Gmail mailbox and export them as CSV files with the help of a simple Google Script.
I have written a little utility – The Sender’s List – that will help you extract email addresses from your Gmail account. You may extract addresses from every single message in your Gmail mailbox or it can sift through emails that are tagged with a particular label (or folder).
The extracted email addresses are saved in a Google spreadsheet that you may either download as a CSV file or you can use that raw list as an input for Mail Merge. If you looking to create an email marketing campaign for your clients who are not in your Google Contacts but have previously communicated with you, The Sender’s List could be a time-saving option.
extracted email addresses
To get started, click here to create a copy of the Google Script. Next, put the name of your Gmail folder in cell A2. You may use Inbox for extracting address from mails that are in your Inbox, Starred for just the important emails or All for processing all messages.
Internally, the script pulls email addresses of senders from messages tagged with a particular label and exports them to a Google Sheet. Since the script needs to track messages that have been processed, it applies a new label to these messages and the default name of this label is Processed. If you wish to use a different name, just replace the value of cell B2.
Now choose the Gmail menu in the Google sheet (see screenshot) and select Initialize. Grant the script access to your Gmail mailbox and then choose RunProgram from the same Gmail menu.
The Google script is now running in the background and, depending on the size of your Gmail folder, may take some time to complete. You may close the Google sheet and it will send you an email once the extraction is complete. The duplicate email addresses will automatically be removed from the final list.
If you wish to extract addresses from another Gmail label, just create a new copy of the blank sheet and repeat the steps. Also, you may choose Gmail->Uninstall to stop the background script from running.

Wednesday 29 January 2014

10 Best Ways To Make Money Online

Make Money Online‘ was a secondary source of income in the past.But now many smart people started quitting their regular jobs to make money online and making huge bucks.Online earning is all about proper strategy and implementing things in a right way.All you have to do is to understand your skills and implement them properly in the right place.You may not follow the same path as others are doing.There are thousands of legitimate ways to earn money online just choose the one which best suits you.


1.Is it possible to Make Money Online?

  • Yes,Of course we can Make Money Online.All you have to do is to choose a right path which suits you the best for your skills and start earning.Basically I like blogging ,so started few blogs and earning decent income online.

2.How much time does it take to Make Money Online?

  • You cant Make Money in one night.It takes some time to make money online.Once you start earning money online then nothing can stop you from earning.

3.How much money can we earn online?

  • This depends on your hard work and effort you put to make money online.

10 Best Ways To Make Money Online:

1.Make Money Online With A Website or Blog:

Make Money by blogging
Blogging is so far the best way to make money online in long run.Here at webworld101.blogspot.com .Blogging is wide and you can blog on the interest of your own.Its just sharing your thoughts with people on internet and make money with advertising networks.
  • If you want to get started with Blogging then I recommend you to check out our Blogging ,SEO ,Making Money Online Coaching

2.Make Money Online With Affiliate Marketing:

Affiliate Marketing Model
This is always been one of the best ways to Make Money Online.In this method you have to refer a product to some one.When that person refers you then you will get commission.I will be discussing more about Affiliate Marketing in the upcoming posts.

3.Make Money Online By Uploading and Sharing files(PPD):

You can make some awesome money with PPD site.Here PPD means Pay Per Download.All you have to do is to upload your Files to these sites and you will get a link to share.When people click on this link they will be demanded to do a survey before download.So when people complete the survey you will get paid.
The best PPD site from my experience is FileIce.Net.There are many ways to promote your files and drive traffic which I will sharing in my upcoming posts,so stay tuned.

4.Make Money Online for Clicking Ads:

Some networks offer you money for just reading their mails.Most of you think its scam but believe me there are some networks which really pays like ClixSense.
Best PTC networks from my experience are Neobux and ClixSense.

5.Make Money Online Via Freelancing:

Freelancing is one of the greatest ways to make money online . In order to make money by freelancing ,you need to have a particular talent or skill , on the basis of which you can provide services to others . There are many freelance jobs providing sites ,so choose some of them and earn money by completing the assigned works.
Some best websites to get started with Freelancing are Freelancer,Odesk,Guru,Elance.

6.Make Money Online With Paid Online Surveys:

This is also another great way to make money online as it doesnt require any hard work and great knowledge.All you have to do is to register for a free account on paid online surveys network and give your views,ideas,opinions etc and get paid.One of the best paid surveys networks is Surveypaid.com , Surveyscout.com etc. 

7.Make Money Online By Selling your E-Books:

If you are an expert in any field then you can write E-Books and you can make money online by selling your E-Books.If your book goes viral then you can make tons of money out of it.

8.Make Money Online By Writing Quality Articles:

If you are a good writer then you can write some quality articles and get paid for them.Many Blogs/Websites pay their Guests for writing quality articles for them.
  • You can contact me to work as Article Writer.

9.Make Money with CPA:

CPA is very much similar to Affiliate Marketing but its a lot easier than Affiliate Marketing where we will be earning from Cost Per Sale.But in CPA the visitors might now buy the product but you get paid when they take a specific action like submitting their email id or phone number etc.

The best CPA network to get started is Peerfly.

10.Some More Ways: 

There are much more ways to make money online like Trading(Stock Market),Selling your own products,Data Entry Jobs , Working as Virtual Assistants etc.If I missed any do let me know in your comments.

Conclusion:

There are many ways to make money online legally.In this article I listed 10 best ways to make money online.I will be discussing each and every way in detailed in further articles.
If you are searching for making money online and didn’t find a legit or suitable method then dont loose hope.If you have any specific skill like building Facebook Fanpages ,Article Writing etc then do contact me.I may help you.

Steps to Make nameless or Invisible Facebook Profile name:


[its not nameless, actually its ﱞﱞﱞﱞﱞﱞﱞﱞﱞﱞﱞﱞ symbol ID.. better than a Full name ID :D ]

.
.
1) First of all open Mozilla Firefox/UC Browser

2) Click on Tools >> Options >> Advanced >> Settings….

3) Now click on Manual proxy Configuration >> HTTP Proxy

4) Paste 119.252.160.34 or 118.98.35.251 in HTTP Proxy

5) Paste 8080 in Port.

6) Click OK and OK

7) Now open your Facebook account >> Account Setting

8) Scroll down and change the language from English (US) to Bahasa Indonesia

9) Change your name to RﱞﱞﱞﱞﱞﱞﱞﱞﱞﱞﱞﱞM you need to copy this code from here and paste it.

10) Now Remove the Letter R and M then enter your password and click to Save.

DONE. !!!!

Check this ID: https://m.facebook.com/100003327457334
.

Monday 27 January 2014

HACK WI-FI


How To Hack Wi-Fi
Network:
Note : Only For Educational Purpose.>!!!
1) First we need to scan for available wireless networks.
Theres this great tool for windows to do this.. called “NetStumbler” or Kismet
for Windows and Linux and KisMac for Mac.
The two most common encryption types are:
1) WEP
2) WAP
WEP i.e Wire Equivalent Privacy is not consideres as safe as WAP
i.e Wireless Application Protocol.
WEP have many flaws that allows a hacker to crack a WEP key easily..
whereas
WAP is currently the most secure and best option to secure a wi-fi network..
It can’t be easily cracked as WEP because the only way to retreive a WAP key
is to use a brute-force attack or dictionary atack.
Here I’ll tell you how to Crack WEP
To crack WEP we will be using Live Linux distribution called BackTrack to
crack WEP.
BackTrack have lots of preinstalled softwares for this very purpose..
The tools we will be using on Backtrack are:
Kismet – a wireless network detector
airodump – captures packets from a wireless router
aireplay – forges ARP requests
aircrack – decrypts the WEP keys
1) First of all we have to find a wireless access point along with its bssid, essid
and channel number. To do this we will run kismet by opening up the terminal
and typing in kismet. It may ask you for the appropriate adapter which in my
case is ath0. You can see your device’s name by typing in the command
iwconfig.
2) To be able to do some of the later things, your wireless adapter must be put
into monitor mode. Kismet automatically does this and as long as you keep it
open, your wireless adapter will stay in monitor mode
3) In kismet you will see the flags Y/N/0. Each one stands for a different type
of encryption. In our case we will be looking for access points with the WEP
encryption. Y=WEP N=OPEN 0=OTHER(usually WAP).
4) Once you find an access point, open a text document and paste in the
networks broadcast name (essid), its mac address (bssid) and its channel
number. To get the above information, use the arrow keys to select an access
point and hit <ENTER> to get more information about it.
5) The next step is to start collecting data from the access point with
airodump. Open up a new terminal and start airodump by typing in the
command:
airodump-ng -c [channel#] -w [filename] –bssid [bssid] [device]
In the above command airodump-ng starts the program, the channel of your
access point goes after -c , the file you wish to output the data goes after -w ,
and the MAC address of the access point goes after –bssid. The command ends
with the device name. Make sure to leave out the brackets.
6) Leave the above running and open another terminal. Next we will generate
some fake packets to the target access point so that the speed of the data
output will increase. Put in the following command:
aireplay-ng -1 0 -a [bssid] -h 00:11:22:33:44:55:66 -e [essid] [device]
In the above command we are using the airplay-ng program. The -1 tells the
program the specific attack we wish to use which in this case is fake
authentication with the access point. The 0 cites the delay between attacks, -a
is the MAC address of the target access point, -h is your wireless adapters MAC
address, -e is the name (essid) of the target access point, and the command
ends with the your wireless adapters device name.
7) Now, we will force the target access point to send out a huge amount of
packets that we will be able to take advantage of by using them to attempt to
crack the WEP key. Once the following command is executed, check your
airodump-ng terminal and you should see the ARP packet count to start to
increase. The command is:
aireplay-ng -3 -b [bssid] -h 00:11:22:33:44:5:66 [device]
In this command, the -3 tells the program the specific type of attack which in
this case is packet injection, -b is the MAC address of the target access point, -h
is your wireless adapters MAC address, and the wireless adapter device name
goes at the end.
Once you have collected around 50k-500k packets, you may begin the
attempt to break the WEP key. The command to begin the cracking process is:
aircrack-ng -a 1 -b [bssid] -n 128 [filename].ivs
In this command the -a 1 forces the program into the WEP attack mode, the -b
is the targets MAC address, and the -n 128 tells the program the WEP key
length. If you don’t know the -n , then leave it out. This should crack the WEP
key within seconds. The more packets you capture, the bigger chance you
have of cracking the WEP key.

Wednesday 22 January 2014

How to create a banner for your blog

Image or banner code for your blog:
<a href="TARGET URL">
<img src="IMAGE URL" width="WIDTH" height="HEIGHT"
Border="0"></a>

Just change:
1. TARGET URL — your referral id
2. IMAGE URL — your referral banner
3. WIDTH — the width of your banner, "468" for a
Standard banner
4. HEIGHT — the height of your banner, "60" for a

Standard banner
Example code for a 468x60 banners or image:
<a href="www.website.com">
<img src=www.website.com/image.jpg
Width="468" height="60" border="0"></a>
You can change the width (468) and/or height (60) for
larger Banners or images.

how to access facebook through google plus or Add the Facebook Stream to your Google+ Profile


Do you want to access Google plus and facebook under the same tab on same page.? ??
then surely this post will help you to add your facebook account to google plus and get all the Facebook stream to Google plus. all you have to do is install a plugin which will only gonna take less then 2minutes


How to access Facebook through Google plus:-


  • Visit  here and Download .GOOGLE+FACEBOOK browser extension and install it(only gonna take less then 2min)
  • Now login to your Google plus account   
  • You will see a Facebook button on top.    click on  button
  • and then click on  " f Connect with Facebook "

  • Now click on Allow

  • That's all now you can access facebook through google plus . to access facebook just click on Facebook button

Wednesday 15 January 2014

Facebook Chat Secret Code’s


Facebook is one of the most grown and growing social networks in the world. For the same reason, Facebook hacks and tricks are becoming more popular. Have you ever sent coloured text in your chat on facebook?Most probably the answer will be ‘no’.So check this out!
Wanna try this?
 
[[107015582669715]] = A
[[116067591741123]] = B
[[115602405121532]] = C
[[112542438763744]] = D
[[115430438474268]] = E
[[109225112442557]] = F
[[111532845537326]] = G
[[111356865552629]] = H
[[109294689102123]] = I
[[126362660720793]] = J
[[116651741681944]] = K
[[115807951764667]] = L
[[106596672714242]] = M
[[108634132504932]] = N
[[116564658357124]] = O
[[111669128857397]] = P
[[107061805996548]] = Q
[[106699962703083]] = R
[[115927268419031]] = S
[[112669162092780]] = T
[[108983579135532]] = U
[[107023745999320]] = V
[[106678406038354]] = W
[[116740548336581]] = X
[[112416755444217]] = Y
[[165724910215]] = Z
And the most important part… How to use it?
Just copy the code of the alphabets you need and insert them in chat with a space between each codes. Now there you go with cool coloured text in chat!
Example Here is CODE  For BESOEASY
[[116067591741123]] [[115430438474268]] [[115927268419031]] [[116564658357124]] [[115430438474268]] [[107015582669715]] [[115927268419031]] [[112416755444217]]
 Try This And Spared This language !!!

Access Facebook on any Mobile Without The Internet


Do you have an old phone like Nokia 1100 ???

Don’t Worry You can Use Facebook in it
Here is an Article about it read it and rate.

Do you have an old phone like Nokia 1100, and no reader can do more than just a phone? Or are you stuck in a remote place where no internet or any other form of data (EGDE/GPRS/3G) and the link?
This is not a problem. You can continue with your Facebook by dialing * 325 # on your mobile phone – this service requires no data or Internet plan that will work on phones from the Stone Age.
A brief overview here:


Use Facebook without the Data Plan
Facebook India has partnered with Fonetwish to bring Facebook on every mobile phone without requiring any apps or even the Internet.
In partnership with Fonetwish Facebook India to take any phone or the Internet without running the program.

Dial # 325 number, enter the username and password, select Facebook and use Facebook, there are some basic commands to perform various tasks, online to chat with friends at home and new additions to the list of your friends and more

If the interface to the Unix shell, such as Facebook, and will be very similar. Fonetwish says the service now, Airtel, Aircel, Tata DoCoMo and the idea is not accessible by users in India.

Reasonable prices – you only need to pay 1.00 fee per day for unlimited access.


Thanks for coming by and taking your time to read this post :) I hope you have learnt something today. Now I'd love to hear from you. Got any views, thoughts and questions related to the post? I'm all ears here. Add your comment.

Monday 13 January 2014

How To Get ADSENSE APPROVAL In 1 Day


Its always Better to Earn as a Professional. Adsense is the Most Genuine and Popular Way or website owners and Blogger to Make money for their hard Work. There are also other options to earn money from website content, But As this is From Google, so Nothing can do competition from Adsense. Use this Trick To Get ADSENSE APPROVAL In 1 Day ..
Here Is the Step to get Adsense Approval Easily……
Untitled-1.
So I have seen many people lately moaning about Adsense apps getting denied. Here the point I would like to make, new websites don’t get accepted Instantly however my method of getting accepted can change that.
Just follow the following steps To Get Get ADSENSE APPROVAL In 1 Day -
1. First, Make a new Google account of U.S.A or U.K.
How to do this ? I will tell you.
First of all download required software from the links given below
(i) BLUESTACKS (It works like a android mobile we need this if we don’t have US or UK mobile number)
(ii)Tunnel Bear (It will change your ip and location to US or UK)
(iii) First of all open tunnel bear and sign in with any gmail id and change your location to US or UK same as in the image given below.
a
(iv)Now open bluestacks and go to setting now you have created a US OR UK gmail account without any number verification.
2. Once you have created this account, Head over to YouTube and login with your new GoogleAccount.
3. Head to this page:http://www.youtube.com/account_monetization and click “Enable Monetization”.
4.Now head to:https://www.youtube.com/account_monetization?action_adsense_connection=1 Follow the instructions given, At this stage you can enter your real country.
5. Await Confirmation, I have tested this with 23 people, All got accepted. Now its Your turn
If you plan to use this with blogger please do this afterwards:
1. Go to Blogger.com
2. Click the Blog you want ads on.
3. Click Earnings
4. Click “Get Started”
5. Click “Link account”

Translate